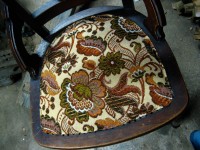
A few winters ago I turned a bunch of unusable (possibly antique?) chairs into pieces of furniture to sit upon.
Here’s the general method I used:
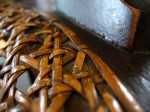
1. Remove old rattan. This type was woven through holes around the edge of the seat and fastened in place with wooden pegs in the holes. I gently pried with a flat screwdriver to get it all off, making sure not to dent the wood. I think I might have used a fine screwdriver to pop the pegs out too.
2. Make a pattern from cardboard and cut out 1/4″ plywood for the base of the seat. (I just used whatever I could find kicking around- nobody should be looking at the bottom of the chairs anyway. Plus it adds character, right?) Fasten this to the bottom of the seat with a lot of small screws (pre-drilled to keep the wood from splitting and not long enough to get anywhere close to punching through.)
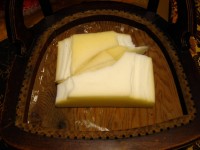
3. Cut some foam- I used 2″- and use scraps to puff up the center of the seat before the main padding, which was cut to about the same size as the plywood. (Also 2″.) Then set it on top, and push it in around the edges.
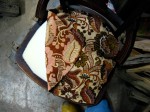
4. Cut the cloth bigger than the cardboard. (Watch out for funny patterns in the cloth- this is where you have to be careful if you don’t want to waste any.) Lay it on top of the foam so that it has even spare cloth all ’round. Then use an upholstery stapler to fasten the cloth. * Note.* I kept the staples along the rattan-hole line so that it could potentially be re-rattaned some day. I started at the front and back centers, then the side centers (so quartered.) You have to pull quite hard when fastening here- it helps to have extra hands, but just be careful with air tools. After the first four staples are in, work your way to the corners, making sure that the cloth is being pulled evenly and tightly, and that no wrinkles get into it. Yes, it can be done.
5. Use a braid and tacks to cover the staple line. I think it could be glued on, but that wouldn’t be good enough in a house like ours. I set the tacks in place first (made sure I had enough) and then drove them in- carefully- with a hammer. (This wood bruises and scratches really easily.) The ends of the braid were in the back corner, covered with a tack. I used a hot melt glue gun to keep the ends from fraying and tucked them neatly under the last tack. You can stretch the braid a little- you definitely don’t want it coming loose, because as soon as it does it will keep getting worse. Also, I cut the tacks down so that they wouldn’t be too long. I used a pair of side cutters and cut them on a steep angle to keep a good point.
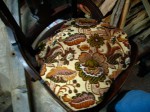
The finished product looks a little funny- I used odd cloth, but now the chairs are at least usable. Just a different kind of eyesore.